BUSINESS
How to Fix WD Hard Drive Not Showing up on Mac – 2025 Tips

[Fixed] Western Digital Hard Drive Not Showing up on Mac
“I dug up an old hard drive and, upon connecting it with my Mac, it doesn’t appear on Finder but appears on Disk Utility. Though it appears to be greyed out. Why is my Western Digital hard drive not showing up on Finder, and is there any fix for it?”
___A Question from Reddit
When your Western Digital hard drive is not detected on your Mac, other than fixing it, rescuing files from it is more challenging. But why does this happen? Don’t worry, though. In this post, we’ll provide an explanation of WD drive non-recognition causes and data recovery solutions based on numerous use cases.
Part 1: Why Is My Western Digital Hard Drive Not Showing Up?
You might be thinking, “Why is my Western Digital hard drive not showing up on Mac?” The answer to that is that there are many scenarios where a Western Digital hard drive is not detected on Mac. Sometimes, it won’t show up on Desktop/Finder, or may or may not appear on Disk Utility. This can hppen due to numerous reasons, such as:
- Loose Connection: The USB cable, port, or adapter might be faulty or not properly connected.
- Power Issues: The drive might need more power than the USB port can provide.
- Incompatible Format: If the drive is formatted for Windows (like NTFS), macOS might not read it without extra software.
- Outdated Software: Old drivers or software can cause connection problems.
- Drive Hardware Problems: The hard drive itself might be damaged.
- Rare Virus Problem: Malware can sometimes block drive access.
Part 2: How to Recover Data From a WD Hard Drive That Won’t Show Up?
When a WD external hard drive is not showing up on a Mac, extract data from it to avoid permanent loss. Otherwise, this might happen if you apply the solutions first, e.g., formatting the disk. You’ll need a specialized Mac data recovery tool that can actually detect the WD hard drive not showing up on Mac and retrieve files from it.
4DDiG Mac Data Recovery is a professional file rescue tool that supports extraction from inaccessible internal and external drives, like the WD, with a high success rate. Besides, you can pick the file types you wish to retrieve and examine them after they’re recovered. Here’s more about this app in detail:
- The recovery app enables restoration from different external storage mediums, including hard drives, SD cards, and USBs, among others.
- The software provides complete recovery support to all major brands, including Western Digital, Seagate, Samsung, LaCie, and more.
- The external disk recovery software provides support for more than 2000 different file types, e.g., audio, video, document, and image formats, along with many more.
- It supports the latest macOS Sequoia and T2, and M series chips.
Here’s how to use this tool to recover files from an inaccessible WD external drive:
Step 1: Connect the inaccessible WD drive to your Mac for access. Then, execute the Mac WD drive recovery tool on your computer.
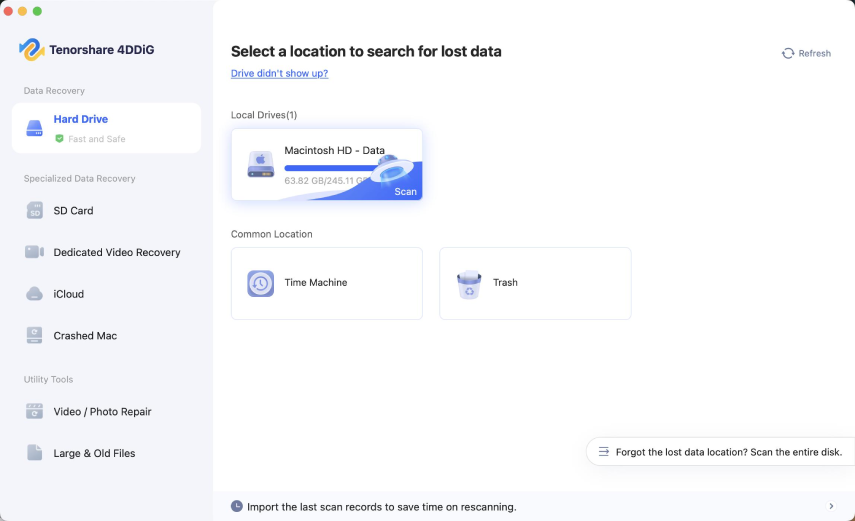
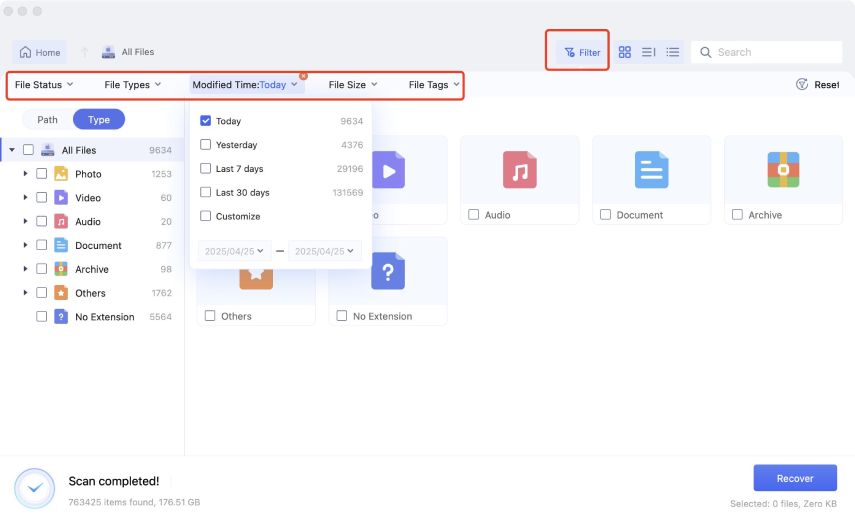
Step 2: Pick the WD drive and file types to scan. Then, hit “Scan.” Pause or stop the scan to locate the files by filtering out results, e.g., with “Modified Time,” “File Size,” etc. You can also enter keywords in the top-right search box to find matching files.
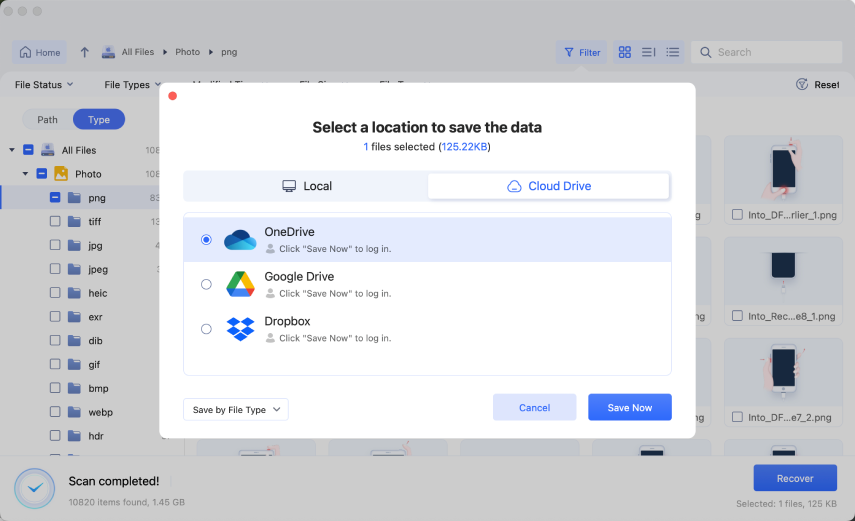
Step 3: Hit “Recover” to move the recovered data from WD to a secure place on your Mac or cloud drive account.
Part 3: Basic Checks Before Fixing WD Hard Drive Not Showing up on Mac
Try basic checks first when your Western Digital external drive is not showing up on Mac. Most of the time, they can fix WD external hard drive and you won’t need to tread into advanced solutions. Here they are:
- Try Another USB Port or Cable: Plug the drive into a different USB port or use a different cable. Make sure it’s the correct type for your drive.
- Test on Another Computer: Connect the drive to another computer to see if it works there. This helps rule out issues with your Mac.
- Check the Drive’s Light: Look for the power light on the drive. If it’s off, the drive might not be getting power.
- Use a Different Power Outlet: Try a different wall outlet to make sure the drive is getting enough power.
- File Format Compatibility: Make sure the drive is in a format macOS can read. NTFS drives may need extra software to work fully on a Mac.
Part 4: Methods to Fix Western Digital Hard Drive Not Showing up on Mac
If basic checks are unable to fix WD external hard drive not detected on Mac issue, proceed to advanced solutions.
Case 1: WD Hard Drive Isn’t Showing up in Finder/on the Desktop
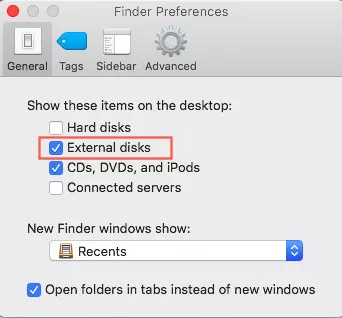
Your Finder Preferences might be set to exclude external disks from appearing on the Finder/Desktop. This might be why the WD external hard drive is not showing up on Mac. You can enable the disk to apear on the Finder/Desktop in the Finder Preferences. To do so:
Step 1: Head to “Finder.” Then, choose “Preferences.” Tap “Sidebar.”
Step 2: Then, tick mark “External disks” beneath “Locations.”
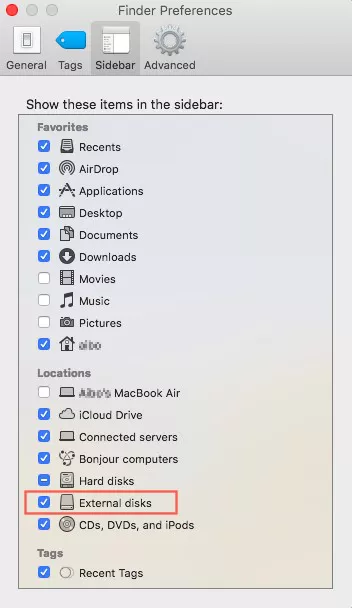
Step 3: Go back to “Preferences.” Next, select “General.” Tick mark “External disks.”
Case 2: WD Hard Drive Is Detected but Not Accessible in Disk Utility
Fix 1: Manually Mount the External Hard Drive
If your Western Digital external drive is not mounted on your Mac, you can manually mount it in Disk Utility. To do so:
Step 1: Connect the inaccessible WD drive to your Mac for access. Then, Execute “Disk Utility.” Right-click the WD drive. Tap “Mount.”
Step 2: When the disk is successfully mounted, it will show up on the Desktop and you will be able to access it without trouble.
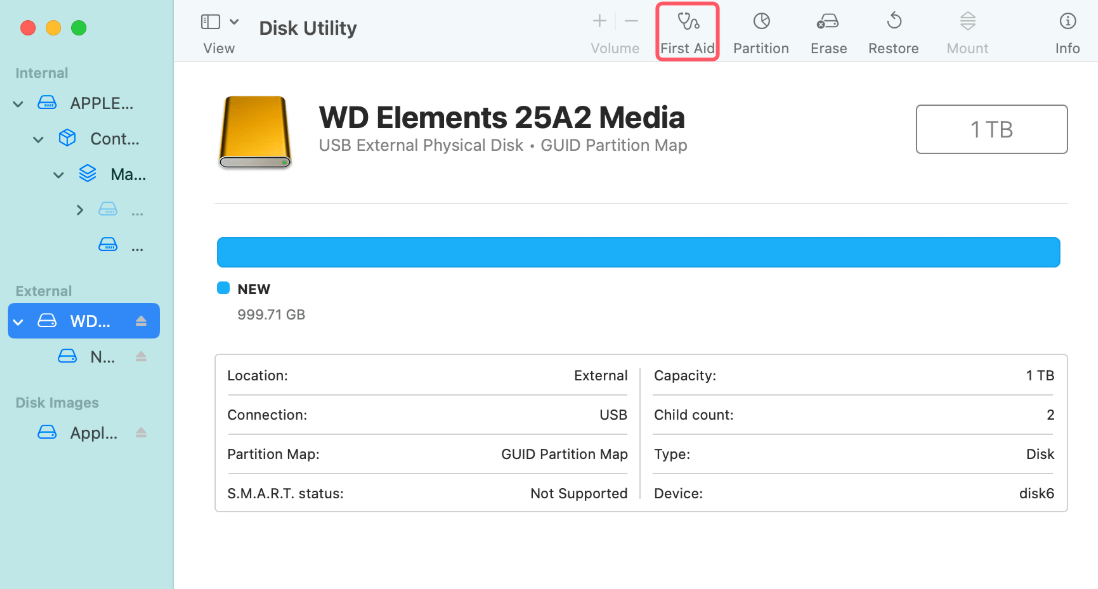
Fix 2: Run First Aid on Your Drive
When your WD external drive is unable to be manually mounted on the Mac, it might be because of some errors that are preventing its mounting procedure. You can fix them through Mac’s built-in First Aid tool. Here’s how:
Step 1: Connect the inaccessible WD drive to your Mac for access. Then, Execute “Disk Utility.”
Step 2: Tap the WD disk. Next, choose “First Aid” from the above menu. Hit “Run.”
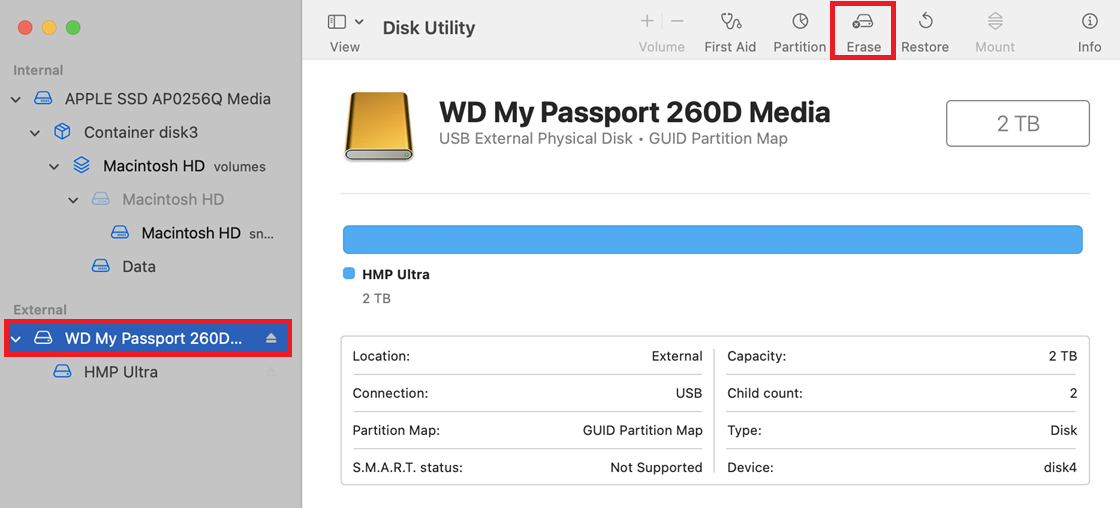
Fix 3: Format the Hard Drive
Even if First Aid can’t repair the WD external drive, its file system or partition might be corrupted. So, you’ll need to format the disk. To do so:
Step 1: Connect the inaccessible WD drive to your Mac for access. Then, Execute “Disk Utility.”
Step 2: Tap the WD disk. Next, choose “Erase” from the above menu. Choose a “Name” and “Format,” e.g., APFS Format. Hit “Erase” again.
Case 3: WD Hard Drive Isn’t Showing u
p In Disk Utility
Fix 4: Boot into Safe Mode
Recently installed apps can interfere with the disk, resulting in the Western Digital external drive not showing up on Disk Utility. So, you can enter into Safe Mode to examine whether the WD drive appears there and uninstall the interfering apps. To do so:
Intel Macs:
Step 1: Shut down your Mac and wait 10 seconds. Then, switch it on.
Step 2: Immediately hold the “Shift” key. Let go when you see the login screen.
Step 3: Connect the inaccessible WD drive to your Mac for access and examine if it appears in the Disk Utility.
Apple Silicon Macs:
Step 1: Shut down your Mac and wait 10 seconds. Press and hold the “Power” button until you see startup options.
Step 2: Select the startup disk. Next, hold “Shift.” Click “Continue in Safe Mode.” Then, release “Shift.”
Step 3: Connect the inaccessible WD drive to your Mac for access and examine if it appears in the Disk Utility.
Fix 5: Rset the NVRAM
NVRAM stores important Mac settings like volume and display preferences. If they’re corrupted, they can cause the ‘WD hard drive not showing up on Mac’ problem. So, you can reset them. Here’s how to do that:
Step 1: Click the “Apple logo” on your Mac. Then, choose “Restart.” When the screen goes black, press and hold “Option + Command + P + R.”
Step 2: Keep holding these keys until you hear the startup sound twice or see the Apple logo appear and disappear twice.
Step 3: Connect the inaccessible WD drive to your Mac for access and examine if it appears in the Disk Utility.
Fix 6: Contact a Professional
If all else fails to resolve the ‘WD external hard drive not showing up’ on Disk Utility issue, the problem might be due to hardware. Therefore, contact an external disk repair service to fix it.
Bottom Line
If you were wondering, “Why is my Western Digital hard drive not showing up in Disk Utility or on Finder, we’ve clarified in this post. But before trying to fix the Western Digital hard drive is not detected on your Mac, which might erase your data, use 4DDiG Mac Data Recovery. It’s a user-friendly tool that helps recover files from drives your Mac can’t read, making it a safe first step.
In today’s fast-paced world, customer experience (CX) has emerged as a vital ingredient for business success. Companies that prioritize CX not only stand out from the competition but also build lasting relationships with their customers. But what does it take to elevate your customer experience to new heights? Enter BinusCX—a groundbreaking approach designed to innovate and enhance every interaction between businesses and their clients.
Whether you are a seasoned entrepreneur or just starting on your business journey, understanding how BinusCX can reshape your strategy is essential. Get ready to dive into the essentials of this transformative tool, explore its key features, and discover real-world examples of companies reaping its benefits!
Understanding Customer Experience (CX)
Customer experience (CX) refers to the overall perception customers have of a brand based on their interactions. It encompasses every touchpoint, from initial awareness to post-purchase engagement.
At its core, CX is about understanding and meeting customer needs. This means listening actively and responding effectively at each stage of the buyer journey.
A great CX goes beyond mere satisfaction; it creates emotional connections that foster loyalty. Customers who feel valued are likelier to return and recommend your brand.
In today’s digital landscape, expectations are higher than ever. Consumers seek personalized experiences that resonate with them individually.
Businesses need to embrace this shift by creating seamless journeys across multiple channels—whether online or offline. By doing so, they can turn casual buyers into passionate advocates for their brands, paving the way for long-term success in an increasingly competitive market.
The Importance of CX in Business Success
Customer experience (CX) is a vital driver of business success in today’s competitive landscape. Companies that prioritize CX often see enhanced customer loyalty and increased revenue. Satisfied customers are more likely to return and recommend your brand to others.
Moreover, positive experiences can set you apart from competitors. In markets saturated with similar products, exceptional CX becomes a key differentiator. It fosters trust and emotional connections between the consumer and your brand.
Investing in CX not only boosts satisfaction but also reduces churn rates. When customers feel valued, they are less inclined to switch brands for minor advantages elsewhere.
Additionally, effective customer experience strategies provide valuable insights into consumer behavior. Understanding preferences helps businesses adapt their offerings to meet evolving demands, ensuring long-term growth and sustainability within the market.
What is BinusCX and How Does it Work?
BinusCX is an innovative platform designed to enhance customer experience across various business sectors. It leverages advanced technology to streamline interactions between companies and their customers.
The platform uses data analytics to gain insights into customer behavior. This allows businesses to tailor their services for better engagement. By identifying trends, BinusCX helps organizations anticipate needs before they arise.
Users can access multiple tools within the platform. These include feedback loops, journey mapping, and performance metrics. Each feature empowers teams to make informed decisions based on real-time information.
Integration with existing systems is seamless, ensuring that businesses don’t face disruption during implementation. With BinusCX, companies can foster a culture of continuous improvement in customer relations while staying ahead of market demands.
Key Features and Benefits of BinusCX
BinusCX stands out with its user-friendly interface, making it easy for businesses to navigate. This simplicity encourages teams to engage more deeply with the platform.
Another key feature is real-time analytics. Companies can track customer interactions as they happen, allowing for swift adjustments in strategy. Data-driven decisions become a breeze.
Customization options are abundant, enabling brands to tailor their CX solutions according to specific needs. This flexibility is crucial in today’s diverse market landscape.
Moreover, BinusCX promotes seamless integration with existing systems. Businesses can enhance their current workflows without disruptive overhauls or significant downtime.
Collaboration tools within BinusCX foster teamwork among departments. A unified approach ensures that everyone from marketing to support works toward a shared vision of exceptional customer experience.
Continuous updates and enhancements keep the platform ahead of industry trends, ensuring users benefit from the latest innovations in customer experience management.
Case Studies: How Companies Have Utilized BinusCX to Improve CX
Several companies have successfully harnessed the power of BinusCX to elevate their customer experience.
A leading retail brand utilized BinusCX analytics to identify pain points in their shopping journey. By implementing personalized recommendations, they saw a 20% increase in conversion rates within just three months.
In the hospitality sector, a hotel chain adopted BinusCX for real-time feedback from guests. This proactive approach enabled them to address complaints immediately, resulting in increased guest satisfaction scores and positive reviews across online platforms.
Another tech startup integrated BinusCX to streamline its customer support process. With automated responses and an intuitive interface, response times decreased by over 30%, allowing agents to focus on complex issues.
These case studies illustrate how diverse industries leverage BinusCX as a catalyst for improvement. Each organization was able to tailor strategies that align with their unique goals while enhancing overall engagement with customers.
Implementation and Integration of BinusCX in Your Business
Implementing BinusCX in your business can be a transformative experience. Start by evaluating your current customer experience strategy. Identify areas that need improvement, and set clear goals for what you want to achieve with BinusCX.
Next, integrate the platform with your existing systems. This could involve syncing tools like CRM software or marketing automation platforms. Seamless integration is crucial for maximizing efficiency.
Training your team is essential as well. Ensure they understand how to use BinusCX effectively and are familiar with its features. Conduct workshops or provide resources to facilitate this learning process.
Monitor progress regularly. Use data analytics provided by BinusCX to assess improvements in customer satisfaction and engagement levels. Continuous assessment will help refine strategies over time, ensuring long-term success in enhancing customer experiences.
Conclusion
Customer experience is a vital aspect of any successful business strategy. Understanding and enhancing CX can lead to lasting customer loyalty, increased revenue, and a strong market presence. BinusCX emerges as an innovative solution in this landscape, offering tools designed for businesses eager to elevate their customer interactions.
The platform’s features provide powerful insights that guide companies towards making informed decisions. By leveraging data analytics and user-friendly interfaces, BinusCX empowers organizations to understand their customers better than ever before.
As illustrated through various case studies, many businesses have transformed their CX practices by integrating BinusCX into their operations. The results speak volumes: improved satisfaction rates and higher retention levels showcase the tangible benefits of adopting this approach.
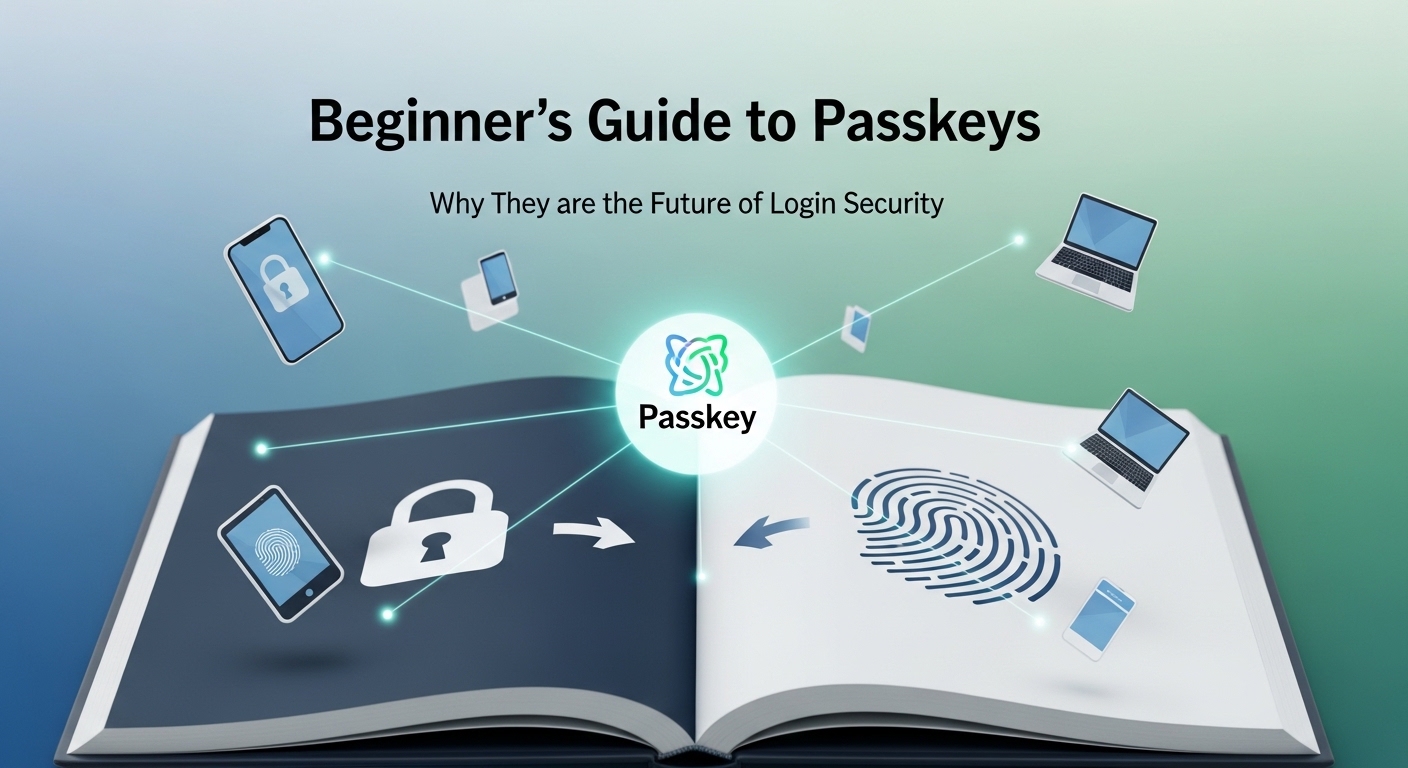
Passkeys have become the reason that the days of memorising long passwords are behind us. Authentication is now safer, more seamless, and a little more sophisticated. Understanding what is passkey, and how it works on a fundamental level is important for anyone who is doubtful about its usability. While the term and the process itself might seem very technical, it’s quite simple—and that is what we’ll explain in this blog.
How Passkeys Work (Without the Tech Jargon)
To explain it simply, a passkey is like a digital handshake between your device and the service that you’re logging into. Step by step, here’s how it looks:
- You register, and your device generates both a public and a private key.
- The private key is on your device and stays there. It is not accessible to anyone else.
- The public key, on the other hand, is shared with the service, so it’s in the server.
When you log in, the service sends a cryptographic challenge that only a private key can sign. This signed challenge is then sent back to the server, which verifies it using the corresponding public key. At no point in this process is a traditional password generated, shared, or stored externally. This explains What is passkey in practice—a secure authentication method where credentials remain protected on the user’s device, making them immune to interception, phishing, or credential theft.
To make the correlation easier to understand, think of it like proving ownership of a safe without opening it. The server knows that it belongs to you, and no one else can open it. So you intermediate a process that is secret to the two of you.
Why Hackers Can’t Steal What You Don’t Know
Passkeys have an innate advantage—they are inherently phishing-resistant. Traditional credentials, such as passwords, can be stolen through fake or look-alike websites, but passkeys are cryptographically bound to the correct origin. This is a key part of what is passkey security. Even if a user is tricked into visiting a malicious site, the private key stored on the device will refuse to authenticate because the domain does not match the registered public key, effectively blocking phishing attacks at the source.
The thing with passwords is that if you guess the correct one, you have access to what you’d call basically the whole online presence of a person. Passkeys, on the other hand, cannot be used like that.
One, each login uses a unique cryptographic challenge, so even if a response were intercepted, it couldn’t be reused. Secondly, the private key never works in isolation—authentication is only possible when the server verifies it against the matching public key. The design works on a very fundamental security model. So instead of relying on human vigilance and hackers benefiting from the fatigue of it, this cryptographic system helps you stay secure with minimal effort.
One Key, All Devices
One concern with device-bound credentials is mobility. Modern passkey systems solve this with secure syncing.
- Passkeys can move across devices within a trusted ecosystem.
- The private key can be securely synced across trusted devices using end-to-end encrypted cloud services, without exposing it in readable form.
- When you log in from a new device, the system verifies your identity and provisions access without exposing the private key.
This means your passkey is portable but never exposed, allowing smooth access from phones, tablets, laptops, or desktops.
What If You Lose Your Phone? What’s the Recovery Process
This is a common concern, but Passkey anticipates it. Recovery can be done via trusted backup devices and cloud-synced credentials.
- If one device is lost, your other devices or secure cloud backups can generate a new key pair.
- The old key is revoked, preventing unauthorised access.
- Recovery is user-driven but cryptographically enforced, ensuring security isn’t compromised even during emergencies.
This approach removes the fear of being locked out and losing your data. This thing is common with both passwords and passkeys; they’re recoverable.
Goodbye MFA, Speeding Up Your Login Without Losing Safety
Passkeys combine authentication and verification in one step, removing the need for separate multi-factor prompts, such as SMS codes or authenticator apps, in many cases.
- Device authentication (biometric or PIN) acts as both “something you have” and “something you are”.
- This simplification reduces friction without reducing security.
- Users can authenticate in seconds while organisations maintain cryptographically strong login guarantees.
Essentially, passkeys achieve passwordless, MFA-equivalent security automatically.
Setting the Foundation: What You Gain From Using Passkeys
By understanding and adopting passkeys, users and organisations benefit from:
- Elimination of shared secrets, making stolen passwords obsolete.
- Strong cryptographic authentication that is origin-bound and phishing-resistant.
- Seamless multi-device access without compromising security.
- Streamlined user experience, removing friction from login flows.
- Passkeys help organisations meet modern authentication and security control requirements found in many compliance frameworks.
These features make passkeys not just a replacement for passwords but a redefinition of digital identity itself.
Conclusion
By now, you know the answers to – What is passkey and how can it benefit you? Passkeys can provide a stronger, faster, and more intuitive alternative to traditional passwords in terms of authentication. They are smart, reliable, and require minimal effort from your end. Remembering passwords can be a hassle, and that is something you do not have to worry about anymore. Passkeys do the heavy lifting for you, here

Companies deal with unpredictable pipelines more often than they’d like. One month looks great, the next one is quiet. That kind of inconsistency slows growth and makes forecasting tough. Lead generation packages solve this by providing businesses with a repeatable, structured system rather than scattered efforts. You get clarity on what’s being done, who’s being targeted, and when results should show up.
What’s Typically Included in B2B Lead Generation Packages
A solid package covers every step required to find and engage the right buyers. It keeps outreach unified, consistent, and tied to your Ideal Customer Profile.
- Prospect research & ICP refinement: This begins with defining the right prospects. A team reviews your ICP, analyzes markets, and builds targeted lists of decision-makers. The goal is to make sure outreach focuses on companies that actually match your offer.
- Multi-channel outreach (email, LinkedIn, calls): Reaching prospects through several channels increases response rates. Packages usually include coordinated outreach via email, LinkedIn, and phone, ensuring your message reaches prospects where they prefer to communicate.
- Messaging creation & personalization: Strong outreach depends on relevant, human-sounding messaging. Teams write email sequences, LinkedIn scripts, and calling guides tailored to your industry. Personalization is added to help you stand out from generic campaigns.
- Data validation, enrichment, and QA: Good data is at the core of predictable results. Every contact is checked, verified, and enriched to reduce bounce rates and avoid wasted outreach. Ongoing QA keeps campaigns clean and compliant.
Learn more about the key cost drivers behind lead generation services, how different package tiers influence overall spend, and what factors businesses should evaluate before choosing an option.
Types of Lead Gen Packages
Lead generation isn’t one-size-fits-all. Different companies have different levels of readiness, sales cycles, and goals, so packages are built to match those stages. Below are the three most common options, along with the types of businesses they’re designed for.
Pilot Package
A pilot package is the safest starting point for teams that want to test outbound without committing to a long-term plan. It’s ideal for companies that are exploring a new ICP, entering a fresh market, or simply unsure how well outbound will work for their offer.
This option usually runs for one to two months and focuses on a smaller volume of outreach. The goal is fast learning. You see which messaging resonates, which titles get the most replies, how long the sales cycle feels, and whether your product speaks to the prospects you’re targeting.
The pilot package works especially well for startups, companies launching new products, or B2B teams that have relied primarily on referrals and inbound and want to add outbound without risk.
Growth/Business Package
The business growth package is for companies that already know their ICP and want predictable monthly meetings. It’s built for teams that need stability: steady outreach, steady performance, and a precise monthly flow of qualified conversations.
This package usually includes larger volumes of research, multi-channel outreach, richer personalization, and ongoing optimization. It’s the sweet spot for most B2B companies.
Sales teams benefit the most here: SDRs get a reliable stream of leads instead of scrambling for prospects, and founders no longer rely on sporadic outreach. If your next step is scaling revenue, increasing deal flow, or shortening the gap between closed deals, this package is a strong fit.
Enterprise Package
Enterprise packages are built for companies with broad territories, complex buyer journeys, or aggressive growth goals. They’re designed for teams that need outbound running across multiple markets, industries, or product lines simultaneously.
These packages handle high outreach volumes, deeper levels of research, and custom workflows integrated with internal systems. They often include multiple SDRs, multilingual outreach, advanced reporting, and detailed performance tracking.
Enterprise fits companies with mature sales operations, larger teams, or VP-level growth targets where consistency, scale, and cross-market coverage are non-negotiable. It’s the best choice for organizations that treat outbound as a long-term engine rather than a temporary boost.
Key Factors to Consider When Choosing a Package
Choosing the right lead generation package comes down to understanding what your team needs today and what will matter in a few months. A package should match your goals, support your sales process, and give you the level of control you want over results. Here are the core factors to look at before committing to anything:
- Monthly lead/meeting volume: Ensure it aligns with your sales capacity. Too few meetings slow growth, but too many can overwhelm a small team. The right package fits your bandwidth and revenue targets.
- Channel mix: Effective outbound uses multiple channels. Packages that combine email, LinkedIn, and phone outreach usually bring stronger response rates. Check if the provider adapts the mix to your audience.
- Quality of data and research standards: Strong results depend on accurate contact data. Look for manual research, verification steps, and clear QA practices. Poor data leads to bounces, low reply rates, and wasted time.
- Industry-specific expertise: If your market is niche or technical, the team running your outreach should understand it. Familiarity with your industry improves messaging, targeting, and overall performance.
When these factors align, a lead generation package becomes a reliable growth engine rather than an experiment.
Conclusion
Structured packages give companies a clear path to steady growth. Instead of chasing inconsistent outreach or guessing what to try next, you get a system that delivers qualified conversations every month. The research, messaging, outreach, and reporting all work together, making results easier to track and improve.
-

 HEALTH2 years ago
Transformative Health Solutions: Unveiling the Breakthroughs of 10x Health
-

 Posts3 years ago
Siegel, Cooper & Co.
-

 GENERAL2 years ago
Discovering the Artistic Brilliance of Derpixon: A Deep Dive into their Animation and Illustration
-

 Lifestyle3 years ago
Purenudism.com: Unveiling the Beauty of Naturist Lifestyle
-

 FASHION3 years ago
The Many Faces of “λιβαισ”: A Comprehensive Guide to its Symbolism in Different Cultures
-

 Lifestyle3 years ago
BaddieHub: Unleashing Confidence and Style in the Ultimate Gathering Spot for the Baddie Lifestyle
-

 Home improvement2 years ago
Unleash Your Creative Side: Exploring Stylish Rug Collections to Elevate Your Space with Quality Rug & Carpet Options
-

 PETS2 years ago
From Bows to Bandanas: Elevate Your Dog’s Style Game with These Trendy Accessories